If you’ve ever found yourself mesmerized by the colorful movement of a lava lamp, you’re not alone. It’s that nostalgic, retro vibe that sparks creativity and brings a splash of fun into our lives. I created this post because I wanted to showcase a unique way to capture that iconic look right at your fingertips. Nail art is a fantastic medium for self-expression, and what better way to celebrate the bold colors and swirling patterns of lava lamps than with stunning lava lamp nail art designs?
This guide is for everyone who loves a splash of color and a hint of nostalgia in their style—those who appreciate retro nail designs and want to experiment with vibrant, lava lamp-inspired art. Whether you’re a seasoned nail artist or just starting out, you’ll find plenty of inspiration here. I pulled together 16 creative nail painting techniques that are playful, colorful, and perfect for any occasion. From classic swirls to glittery interpretations, you’ll have a blast exploring these unique styles for your next manicure.
Get ready to unleash your creativity! By the end of this post, you’ll have a treasure trove of lava lamp nail art ideas that will leave your friends in awe. So, grab your nail polish and let’s dive into these retro cool designs that will make your nails the center of attention!
Key Takeaways
– Discover 16 unique lava lamp nail art ideas, including styles like Classic Swirls and Neon Dreams that celebrate retro vibes.
– Learn creative nail painting techniques that blend colors and patterns, making it easy to channel your inner artist.
– Find tips on achieving different effects like glittery accents and ombre blends that will elevate your nail designs.
– Get inspired by vintage nail trends and how they can be modernized for today’s fashion-forward styles.
– Explore ways to personalize your nail art, ensuring each design reflects your unique personality and flair.
1. Classic Swirls

Embrace the charm of retro aesthetics with classic swirl patterns that echo the mesmerizing flow of a lava lamp. This design captivates with its pastel base, providing a soft canvas for lively swirls in vibrant colors like teal, orange, and purple. The fluidity of the swirls brings an organic feel to your nails, creating an eye-catching look that’s both playful and elegant.
To achieve this stunning design, consider using a high-quality striper brush for precise lines. You can also explore a variety of color combinations to make a unique statement. Don’t forget to seal your masterpiece with a glossy top coat for an added shine that enhances the overall aesthetic.
Consider these elements to maximize this palette’s potential:
– Pair a pastel base coat with lively swirls.
– Use a striper brush to create fluid designs.
– Incorporate contrasting colors to add depth.
– Finish with a glossy top coat for shine.
This artistic approach not only highlights your creativity but also enhances the overall visual appeal of your nails, making them the perfect accessory for any outfit.
Fun fact: 3-color lava lamp swirls in pastel bases instantly look more dynamic with a precision striper brush. Pro tip: layer teal, orange, and purple in quick, wavy lines—perfect for classic swirls in retro lava lamp nail art.
Classic Swirls
Editor’s Choice


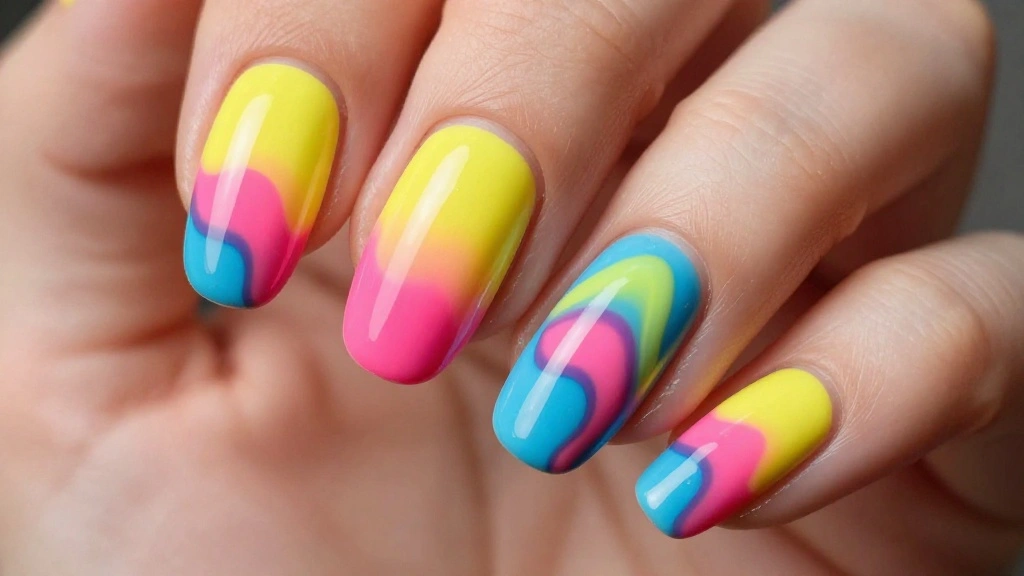
2. Neon Dreams

If you adore bold colors, neon lava lamp nails are a fantastic choice! Start with a dark base, like black or deep blue, to create a striking backdrop for vibrant neon shades such as pink, green, and yellow. The sponge application mimics the radiant glow of a lava lamp, resulting in a fun design that captures attention and embodies the spirit of retro style.
To achieve this eye-popping look, use a makeup sponge to effortlessly blend the neon hues into a gradient. Make sure each layer dries thoroughly before applying the next to keep the colors crisp and clean. Feel free to play around with different placements for a personalized touch.
Consider these tips for a vibrant neon effect:
– Use a dark base for contrast against neon shades.
– Employ a sponge for a smooth gradient.
– Layer colors carefully for a striking finish.
This dazzling design not only stands out but also brings an energetic vibe to your nails, making them a perfect choice for any fun outing.
3. Marble Effect

For a touch of sophistication paired with retro flair, marble nail art channels the essence of lava lamps beautifully. Using a combination of colors like lavender, mint, and white, you can create an elegant marble effect that mirrors the unique movement of lava. This design is a perfect blend of chicness and playfulness, ideal for any occasion.
To achieve this look, start with a light base coat and gently swirl your chosen colors together using a nail art brush. Experiment with different combinations to find your ideal marble mix. Remember to seal your design with a quality top coat for lasting brilliance.
Here are some tips to create a stunning marble effect:
– Use a toothpick for finer details in the marble.
– Experiment with color combinations to find your perfect mix.
– Seal your design with a top coat for durability.
This elegant style enhances your nails while providing a whimsical nod to retro charm, ensuring your look remains timeless.
Marble nail art brings retro flair to every day. Start with a light base coat, then swirl lavender, mint, and white to mimic lava lamp movement—it’s chic, playful, and surprisingly easy to share.
4. Glitter Lava

Glitter adds a delightful touch to nail art, and when paired with lava lamp-inspired designs, it creates a stunning effect. Begin with a bright base color that echoes the wax of a lava lamp, then layer on chunky glitter polish to mimic sparkling bubbles. The key to this look is finding the right balance; the glitter should enhance, not overpower, your base color.
For a captivating result, mix large and fine glitter for a multi-dimensional effect. If you prefer a different vibe, consider applying a matte top coat for a unique finish. Feel free to customize the glitter layers to match your style.
To achieve this dazzling glitter lava effect:
– Use both large and fine glitter for depth.
– Apply glitter strategically to prevent clutter.
– Seal with a top coat for shine and durability.
This festive design is perfect for special occasions, ensuring your nails sparkle with every movement.
Glitter Lava
Editor’s Choice


5. Ombre Lava

Ombre designs are a trendy choice that seamlessly aligns with the lava lamp theme. Choose colors that transition smoothly, such as sunny yellow to fiery orange or serene blue to soft pink. Starting with a lighter shade at your cuticle and blending into a deeper hue towards the tips creates a stunning gradient reminiscent of flowing wax in a lava lamp.
To perfect this look, utilize a makeup sponge for effortless blending. Patience is key, so let each layer dry before adding the next. A glossy top coat will elevate the ombre effect, making it shine even brighter.
For an eye-catching ombre lava design:
– Use a sponge to blend colors smoothly.
– Allow each layer to dry thoroughly before proceeding.
– Finish with a top coat for dazzling shine.
This playful yet elegant design is perfect for any occasion, ensuring your nails remain a focal point of attention.
Ombre Lava
Editor’s Choice


6. Retro Dots

Polka dots bring a fun and whimsical element to your lava lamp-inspired nails. Start with a vibrant base coat and use a dotting tool to create varying sizes of dots in contrasting colors that mimic the bubbles found in lava lamps. This easy-to-execute design is not only playful but also perfect for casual outings and gatherings.
For best results, use a larger dotting tool for bigger bubbles and a smaller one for details. Mix and match colors to find combinations that suit your style. A top coat will seal your design for lasting wear.
To create cheerful retro dots:
– Use a dotting tool for various bubble sizes.
– Experiment with contrasting color combinations.
– Seal your design with a top coat for durability.
This design is sure to uplift your mood and add a splash of fun to your nails!
7. Gradient Glitter Tips

Combine gradient techniques with glitter tips for a playful take on lava lamp nail art. Start with a soft base color like peach or mint, then create a gradient effect blending a deeper shade at the tips. Finish with glitter polish on the tips for that dazzling lava lamp sparkle! This design strikes a perfect balance between chic and fun, making it suitable for both casual and formal events.
To master this look, use a small sponge for better control when applying the gradient. Allow your first layer to dry before adding the next to achieve a smooth finish. Opt for fine glitter for a subtle yet stunning contrast.
To create gorgeous gradient glitter tips:
– Use a sponge for seamless blending.
– Ensure the base layer is fully dry before the gradient.
– Apply glitter at the tips for added sparkle.
This design is perfect for those who want a refined yet playful look on their nails.
Pro tip: use a small sponge to blend your gradient for lava lamp nail art, because it’s quick, easy, and super controllable. Finish with glitter tips for that retro sparkle, and you’ve got a chic, versatile look for any event.
8. Lava Bubbles

Add a fun 3D effect to your nails that mirrors the bubbling liquid of a lava lamp using small beads or gemstones! Start with a solid color base polish, then apply a top coat to strategically place tiny beads on your nails. Choose contrasting colors for the beads to create an eye-catching look! This tactile design not only looks fantastic but also introduces an extra dimension to your nails, making them uniquely playful.
For precise placement, use a pair of tweezers to position the beads accurately. Consider mixing sizes for an interesting and dynamic effect. Be sure to seal the entire design with a top coat for longevity.
Create fun lava bubbles with these steps:
– Use tweezers for precise bead placement.
– Mix sizes for a unique look.
– Seal the design with a top coat for durability.
This playful design is sure to be a conversation starter, showcasing your creative flair!
Lava Bubbles
Editor’s Choice


How To Choose the Right Lava Lamp Nail Art Design
Choosing the best lava lamp nail art design can seem overwhelming, especially with so many options to consider. Here are some key points to guide you in selecting the perfect style for your nails.
1. Color Scheme
Start by deciding on a color palette. Lava lamps are known for their vibrant and swirling colors. Think about what colors you want to wear. You could go for classic lava lamp hues like bright yellows, greens, and pinks, or choose a more muted palette for a subtle look. Consider how these colors will fit with your style and wardrobe.
2. Nail Length and Shape
Your nail length and shape will impact how the design looks. Longer nails can showcase more intricate details, while shorter nails may need simpler designs. If your nails are oval or almond-shaped, you might want to use designs that complement those curves. Rectangular nails can handle bolder designs. Make sure to choose a design that fits the canvas you have!
3. Skill Level
It’s important to assess your nail art skills. If you’re a beginner, opt for simpler designs like the “Classic Swirls” or “Retro Dots” that are easier to execute. For more experienced nail artists, designs like “Mosaic Style” or “Abstract Lava” can be both challenging and rewarding. Remember, practice makes perfect!
4. Occasion
Think about where you plan to show off your lava lamp nails. Are you going to a casual gathering, a party, or just looking for everyday wear? For special occasions, consider more flamboyant designs like “Glitter Lava” or “Celestial Lava.” For everyday use, trendy options like “Ombre Lava” or “Gradient Glitter Tips” work great and are easier to maintain.
5. Nail Art Tools
Ensure you have the right tools on hand. You might need nail brushes for detailed work, dotting tools for creating perfect circles, and striper brushes for lines. A good base and top coat will also enhance your nail art and make it last longer. Investing in quality tools will make the application process smoother.
Pro Tip: Always do a test run on a practice nail before applying your design on all your nails. This will help you see how the colors and patterns look together and make adjustments as needed.
By considering these factors, you’ll be well on your way to creating stunning lava lamp nail art that reflects your personality and style. Enjoy the creative process and have fun experimenting with different designs!
9. Color Blocked Lava

Color blocking offers a vibrant trend that resonates perfectly with the lava lamp theme. Choose two or three colors that evoke the lively shades of a lava lamp, like red, yellow, and green. Paint each section in distinct blocks, leaving spaces blank for a more abstract and artistic look. This bold design exudes energy, making it an ideal choice for those wanting their nails to stand out!
To achieve clean lines, use tape to create sections for your color blocks. Allow each color to dry fully before applying tape for the next section to avoid any smudging. Get creative with geometric shapes to add extra flair.
To create stunning color-blocked lava nails:
– Use tape for sharp lines between colors.
– Let each layer dry before taping for clarity.
– Experiment with shapes for added creativity.
This vibrant design will surely brighten your day, making your nails a stunning focal point.
10. Abstract Lava

If you enjoy avant-garde styles, abstract lava nail art provides a unique twist! Blend splatters, strokes, and dots in colors reminiscent of a lava lamp—think molten reds, shimmering golds, and deep blues. The objective is to create an abstract masterpiece on your nails that invites interpretation, making it a perfect conversation starter!
Using a fan brush will help you achieve expressive splatters and strokes. Embrace the beauty in imperfection; the charm lies in the abstract nature of this design. Feel free to experiment with different colors and textures to personalize your look.
For an expressive abstract lava design:
– Use a fan brush for dynamic splatters.
– Embrace creativity; perfection isn’t necessary!
– Layer colors for depth and intrigue.
This design is perfect for showcasing your individuality and artistic flair!
11. Light and Dark Contrast

Using contrast can create stunning effects in nail art, especially with lava lamp designs. Imagine pairing a soft pastel on one nail with a bold dark color on another. Incorporate designs like swirls or dots to connect the two colors, drawing inspiration from the contrasting nature of a lava lamp.
Utilize complementary colors to create striking contrasts. Incorporate flowing designs that transition from one color to another for a unified look. Ensure your base coat is completely dry before adding additional details.
To create beautiful light and dark contrast nails:
– Use complementary colors for striking effects.
– Incorporate designs that connect the colors.
– Allow base coats to dry fully before detailing.
This design beautifully balances light and dark, making it a versatile choice for any season.
12. Silhouette Shapes

Silhouette designs offer a unique take on the lava lamp trend. Start with a colorful background that resembles the wax in a lava lamp and use a dark polish to create silhouettes, like stars or abstract shapes. This design not only captures the essence of lava lamps but also adds a whimsical touch, making it both playful and chic.
Using stencils can help you achieve precise shapes. Choose colors that contrast well to make the silhouettes pop against the background. A top coat will enhance longevity and shine.
To create beautiful silhouette shapes:
– Use stencils for sharp, clear outlines.
– Select contrasting colors for maximum impact.
– Seal your design with a top coat for durability.
This design is perfect for those who enjoy whimsical yet stylish nail art!
Silhouette Shapes
Editor’s Choice


13. Mosaic Style

Embrace a mosaic style that reflects the layered look of lava lamps. Opt for an array of colors and use a sponge or brush to create small patches, mimicking the uneven texture of flowing wax. The diversity of colors adds depth and a playful touch, ideal for those eager to experiment with various shades on their nails.
Don’t stress about achieving perfect shapes; the more random, the better! If desired, use a matte finish for a bold contrast. Layering colors can also add dimension and visual interest.
To create a vibrant mosaic style:
– Use a sponge or brush for random color patches.
– Embrace randomness for a unique look.
– Layer colors for added depth and intrigue.
This design is a riot of color, perfect for those with playful personalities!
14. Gradient Hearts

Combine your love for hearts with the retro lava lamp theme by creating gradient heart designs on your nails! Begin with a light base color, then use a sponge to add vibrant heart shapes that transition in color. This charming design delivers a fun and romantic vibe, making it suitable for any occasion.
Using a heart-shaped stencil helps achieve neat and tidy designs. Feel free to mix and match different color combos to find your unique look. Remember to seal with a top coat to keep your hearts looking fresh and vibrant!
To create delightful gradient hearts:
– Use a heart-shaped stencil for precision.
– Experiment with various color combinations.
– Finish with a top coat for lasting vibrancy.
This design is perfect for love-filled days, ensuring your nails are as sweet as your personality!
15. Celestial Lava

Celestial designs beautifully merge the wonders of the night sky with the lava lamp theme. Start with a deep navy or black base and add swirls of vibrant colors reminiscent of constellations and celestial bodies. Incorporate sparkling glitter and gold accents for a magical touch that dazzles! This design captures the whimsical essence of the cosmos while nodding to retro charm.
Use a toothpick for detailed designs like stars and moons. Layer your glitter for that extra sparkle, and don’t forget to seal your work with a top coat for durability.
To create enchanting celestial lava nails:
– Use a toothpick for intricate star and moon shapes.
– Layer glitter for a stunning twinkle.
– Finish with a top coat for lasting beauty.
This dreamy design is a wonderful blend of cosmic beauty and retro flair, perfect for showcasing your celestial style!
16. Vintage Glam

Capture the elegance of vintage glam with refined nail art inspired by lava lamps. Start with a muted base color, such as pale pink or beige, and add delicate gold or silver accents through stripes or dots. This classy design offers a sophisticated nod to retro aesthetics, making it suitable for formal occasions while still embracing the lava lamp inspiration.
For clean lines, use striping tape to create elegant designs with gold or silver accents. Adjust the glitter size for a more subtle or bold effect based on your preference. Finish with a glossy top coat for a polished look that shines.
To achieve refined vintage glam nails:
– Use striping tape for precise, clean lines.
– Experiment with glitter sizes for your desired effect.
– Seal with a top coat for a refined finish.
This design embodies vintage glamour while keeping a fun retro vibe, ensuring your nails exude charm and sophistication.
Conclusion

Lava lamp nail art is a captivating blend of nostalgia and trendy aesthetics, bringing a playful twist to any manicure. With 16 unique ideas at your fingertips, you’re bound to find one that resonates with your style. Whether you prefer bold colors, romantic designs, or sleek elegance, there’s a lava lamp-inspired nail art look for everyone!
Embrace your creativity and let your nails tell a story reminiscent of the past while being utterly chic. Dive into these designs and enjoy a little retro magic every time you glance at your hands!
Note: We aim to provide accurate product links, but some may occasionally expire or become unavailable. If this happens, please search directly on Amazon for the product or a suitable alternative.
This post contains Amazon affiliate links, meaning we may earn a small commission if you purchase through our links, at no extra cost to you.
Frequently Asked Questions
What exactly is lava lamp nail art and why does it feel retro?
Lava lamp nail art mimics the iconic, swirling blobs you see in vintage lava lamps using bright, flowing color on your nails. It’s a playful nod to retro nail designs and vintage nail trends, perfect for adding a splash of color to any look. To get the effect, you layer several colors in blob-like shapes and let them mingle into organic, lava-like patterns for colorful nail art ideas you can wear anytime. It’s easy to recreate at home with a little practice.
What supplies do I need to create lava lamp nail art at home?
Here’s a simple starter kit for lava lamp nail art: a base coat and top coat, 3–5 vibrant polishes (neon or bright pastels), a white or black background color, and a few tools like a dotting tool or toothpicks. You can also have a cleanup brush and nail polish remover on hand, plus optional silicone oil or a tiny spritz bottle to help blobs separate for a true lava look. With these basics, you’re ready to start experimenting with lava lamp inspired art on your nails.
Which color palettes work best for retro lava lamp nail art?
Go bold with combos like neon pink and turquoise, electric blue with sunny yellow, or purple and lime green for a real colorful nail art ideas burst. A white or black base can make the colors pop and lean into the retro nail designs vibe, while using 2–3 colors per nail keeps the look cohesive. Don’t be afraid to mix warm and cool tones to echo the energetic spirit of vintage lava lamps.
What are step-by-step tips to apply lava lamp nail art and avoid smudges?
Prep your nails with a clean base and apply a thin base coat. Paint a clean background color if you’re using white or black to make the blobs pop. While the polish is still slightly wet, add blobs of your chosen colors and gently tilt or swirl with a tool to create organic lava shapes. Finish with a thin top coat (or gel top coat if you’re gel-polishing) to seal the design and prevent smudges. Allow to dry fully between steps for best results and enjoy long-lasting results with creative nail painting techniques.
Can I use gel polish for lava lamp nail art and how do I seal it for longevity?
Yes—gel polish is great for durability and a glossy finish on lava lamp nail art. Create your blobs, then cure under a UV/LED lamp according to the gel’s instructions. Apply a gel top coat and cure again to seal the design, then wipe away tackiness if your system requires it. Gel nails tend to last longer and resist chipping, which is perfect for keeping your vintage nail trends looking bright and fresh longer. When it’s time to remove, follow the usual gel removal steps so your natural nails stay healthy.
Related Topics
lava lamp nail art
retro nail designs
colorful nail art
vintage style
creative nail techniques
nail art inspiration
easy nail designs
DIY nail art
trendy nail styles
beginner friendly
bold patterns
nostalgic aesthetics